


Only released in EOL distros:
Package Summary
ros-rt-wmp-us-raw
- Author: Danilo Tardioli, dantard@unizar.es
- License: GPL v2
- Source: git https://github.com/dantard/unizar-rt-wmp-ros-pkg.git (branch: master)
Package Summary
ros-rt-wmp-us-raw
- Author: Danilo Tardioli, dantard@unizar.es
- License: GPL v2
- Source: git https://github.com/dantard/unizar-rt-wmp-ros-pkg.git (branch: master)
Contents
Package Summary
The ros_rt_wmp is a ROS node capable of replicating whatever ROS topic or service in another computer wirelessly connected with the source without the need of sharing the same roscore.
The code can be found here.
As an example consider a team of robots building cooperatively a map. The robots have to exchange their laser and pose information. However if the network that connect the robots is not completely connected and they can't use an infrastructure network there is no way to share data among robots using the ROS unless a routing protocol is set up on top of the IP protocol.
The ros_rt_wmp nodes allow that, creating a multi-hop firm real-time network.
Important Notice
Even if we are using the ros_rt_wmp and specially the RT-WMP in our research continuously, this project is very young and bugs can appear during its use. We encourage the users to communicate it to the authors in order to be solved. This node is often updated and new features added frequently. We are working, for example, on making source/destination specification definable through a configuration file.
In any case we would love to hear about your experience, bugs, feature requests and feel free of asking about the operation of the node at the address dantard@unizar.es. On the other hand, any help on developing/testing/debugging/documenting is highly appreciated.
What's new
This package was published for the first time almost 2 years ago. Recently it has been completely rewritten and offers now a much higher user bandwidth.
Check this video where an image topic (24 fps) was replicated over a 3-nodes chain network both using a raw 802.11 protocol with fixed routing and using a single roscore (left) and the use of ros_rt_wmp (right).
Moreover it has been introduced the possibility of using the ros_rt_wmp taking advantage of the kernel-space implementation of RT-WMP. This offers the possibility of remoting access far away nodes by means of standard commands like ssh (see below).
Introduction
Suppose that robot R0 has to share its \laser data with R4 that is, from the point of view of the network topology, 5 hops away and can't/don't want to share the same roscore. To do that is sufficient to instanciate two ros_rt_wmp nodes, the first on R0 and the second on R4. The \laser topic on R0 is remapped to the ros_rt_wmp "input" topic called (for example) /R0/tx/laser. It will provoke the node to send the data published in that topic to node R4 through the network.
At the destination node a topic /R4/rx/R0/laser that replicates the /laser topic on R0 will appear automatically. It means that on R4 we are receiving data from R0 of type laser.
The communication can be bidirectional if we follow the same steps on node R4. It is possible to use whatever number of topics and of whatever type. It is possible to do a similar thing with service also. If we have a service at R1 called /factorial, and we want to call it from R5, we can configure the ros_rt_wmp nodes to have a service /R4/R0/factorial on R4 that, if called, will transparently call the service /factorial on R0 and will return the result to the caller.
To summarize, ros_rt_wmp allows to distribute/decentralize a complex robotics system in multiple computation unit in a transparent form: the only requisite is to know which data from other robots we need in each one of them.
Under the hood
The ros_rt_wmp nodes uses the RT-WMP protocol [1-5] that allows real time communication in wireless mobile ad-hoc networks and supports multi-hop and message priorities.
The data published in the topics are packed by the source ros_rt_wmp node in RT-WMP messages and delivered to the destination node. The latter unpack them and publish data to the correspondent topic. A similar (but two-way) process takes place for services. Since the RT-WMP is capable of managing efficiently the mobility of the nodes, the process is completely transparent to the users that have only to configure the needed topic/services and source/destination for each one of them.
References
[1] D. Tardioli, Real-Time Communication in Wireless ad-hoc networks. The RT-WMP protocol, PhD Thesis, Universidad de Zaragoza, October, 2010
[2] D. Tardioli, J. L. Villarroel, Routing Wireless Real-Time Traffic Using Minimum Spanning Trees, International Conference on Computing, Networking and Communications, To appear, 2012
[3] D. Tardioli, L. Almeida, J. L. Villarroel, Adding Alien Traffic Endurance to Wireless Token-Passing Real-Time Protocols, In the 2010 Asia-Pacific Services Computing Conference, 2010
[4] D. Sicignano, D. Tardioli and J. L. Villarroel, QoS over Real Time wireless multihop Network, In the First International Conference on Ad-hoc Networks, 2009
[5] D. Tardioli and J. L. Villarroel, Real-Time Communications over 802.11: RT-WMP, In the fourth IEEE international Conference on Mobile Ad-hoc and Sensor Systems, 2007
Download and first check
The ros_rt_wmp module is available here and is distributed in a stack that also includes the rt_wmp_msgs that contains the messages used by this module. You can obtain the source code using the git or downloading the compressed file.
Use git
The recommended method is using the git control version system. If you don't know what's git or how to install it, see this page or the documentation of your operating system. In case you are using ubuntu (the O.S. supported officially by ROS) you can install it as follow:
$ sudo apt-get install git-core
after that you can obtain the most up-to-date of rt-wmp as follow:
$ git clone git://github.com/dantard/unizar-rt-wmp-ros-pkg.git
This, will create a ros stack directory called unizar-rt-wmp-ros-pkg.
Use .tar.gz or .zip file
To download the code compressed in tar.gz or zip file, you can follow this link.
Once decompressed, you will have a directory named something like unizar-rt-wmp-ros-pkg-bcc0850. You can rename it to unizar-rt-wmp-ros-pkg to follow the rest of this document.
OS Dependencies
This stack has several dependencies in terms of operating system packages. You can install all of them by typing (Ubuntu):
sudo apt-get install libpcap-dev libvte-dev libz-dev libgtkmm-2.4-dev g++-4.4 linux-headers-$(uname -r)
The gtkmm-dev and g++-4.4 are needed by the visualization tool ros_rt_wmp_sniffer, the linux-headers for the advanced use of RT-WMP in the kernel space.
Compiling the node
This directory should be moved to a path contained in the $ROS_PACKAGE_PATH environment variable where your user have write permissions (do not use ROS own packages path since in /opt you don't have write permissions, probably) or, alternatively, the path where the directory is, must be added to $ROS_PACKAGE_PATH (see here for details).
The directory (that is a ROS stack) should contain:
$ ls -l unizar-rt-wmp-ros-pkg
total 20
-rw-rw-r--  1 user user   70 Mar 28 01:24 Makefile
drwxrwxr-x  9 user user 4096 Mar 28 01:27 ros_rt_wmp
drwxrwxr-x 10 user user 4096 Mar 28 01:26 ros_rt_wmp_msgs
drwxrwxr-x  6 user user 4096 Mar 28 01:48 ros_rt_wmp_sniffer
-rw-rw-r--  1 user user  488 Mar 28 01:24 stack.xml
user being replace by your username. The directory ros_rt_wmp contains the node itself while the ros_rt_wmp_msgs contains the messages used by this ros node. The ros_rt_wmp_sniffer contains a sniffer that can be used to visualize the traffic exchanhged among the nodes.
Enter the unizar-rt-wmp-ros-pkg and type
$ sudo -v
$ rosmake
Important notice: The protocol uses raw sockets for communication. Due to this fact, superuser privileges are needed to compile and execute it. In fact, to avoid problems with the ROS configuration, these privileges are obtained by means of the sticky bit that is set at compilation time in the executable. To do that the sudo command is used at compilation time. It does not mean that you have to use explicitly the sudo command to compile or to execute, just use sudo -v before compiling.
Do not skip the sudo -v command. It will force the system to ask for your password and will allow the compilation script to use the sudo command without asking again. If it is skipped, your compilation can hang since rosmake does not show the password prompt.
The second instruction will compile the whole stack. The result should be something like the following:
[ rosmake ] Results:
[ rosmake ] Built 38 packages with 0 failures.
[ rosmake ] Summary output to directory
In case of errors, goto to the section Troubleshooting.
If everything has gone right, your nodes are ready to be used. To test it you can try:
$ roscore &
$ rosrun ros_rt_wmp ros-rt-wmp --node-id 0 --num-nodes 3 --auto-namespace
If the result is something like:
Reading /home/user/.rt-wmp/rt-wmp.cfg...
File rt-wmp.cfg not found...
Using default values (timeout: 100).
*** Queues loaded, allocated 3204 kbytes
*** Queues loaded, allocated 3211 kbytes
File /home/user/.rt-wmp/rt-wmp-us-raw.ll not found, using default values
Successfully opened socket: 3
Successfully got interface index: 1
Host MAC address: 00:00:00:00:00:00
*** WARNING: Using 'lo' interface
Opening device lo...Success.
*** Node 0 of 3 is up and Running...
the first step has been completed successfully.
Test and first steps
With the previous step, we launched the fist node (--node-id 0) of a 3-nodes network (--num-nodes 3). In fact, in a n-nodes network, the RT-WMP nodes are numbered from 0 to n-1. Let's try now to launch a complete 3-nodes network. At the beginning we will start launching the three nodes in the same machine.
Test the nodes in a single machine
Let's stop the node just launched and execute the rt-wmp.launch file. Type:
roslaunch ros_rt_wmp/launch/rt-wmp.launch
It will start the three nodes. The following topics will appear:
$ rostopic list
/R0/info
/R0/tx/number
/R1/info
/R2/info
/rosout
/rosout_agg
Each node has an /info topic. This topic publish information about the network nodes (NN). For example executing:
$ rostopic echo /R0/info
serial: 4026
loop_id: 984
connected: 1
lqm: [0, 80, 80, 80, 0, 80, 80, 80, 0]
---
serial: 4030
loop_id: 985
connected: 1
lqm: [0, 80, 80, 80, 0, 80, 80, 80, 0]
---
It shows serial, loop id, and the Link Quality Matrix lqm (see [1]..[5]) and the field connected that informs if the network is connected (that is, if a connection among all the network nodes exist).
The node R0 has a /R0/tx/number topic. It means that it has a 'transmission' (tx) topic where other ROS nodes (RN) can publish numbers. It has been defined to be of type std_msgs/Float64.
Let's try to publish something to that transmission topic. In a terminal type:
$ rostopic pub /R0/tx/number std_msgs/Float64 7.5 -r 1
Now retry to execute:
$ rostopic list

/R0/frame_info
/R0/info
/R0/tx/number
/R1/info
/R1/rx/R0/number
/R2/info
/R2/rx/R0/number
/rosout
/rosout_agg
Two additional topics have appeared: /R1/rx/R0/number and /R2/rx/R0/number. These two topics are the replica of the topic /R0/tx/number (where we are publishing data) on the network nodes R1 and R2. In fact if we type:
$ rostopic echo /R1/rx/R0/number
data: 7.5
---
data: 7.5
---
data: 7.5
---
or
$ rostopic echo /R2/rx/R0/number
data: 7.5
---
data: 7.5
---
data: 7.5
---
The name of the topic tells us that in the network node R1 we received (rx) from R0 the topic number.
No connection there is among the three node from the ROS point of view (you can check that with rxgraph or rqt_graph), all the communication passes through the RT-WMP protocol and, in this first example, through the network looback interface lo.
If you are interested in the details, the process is the following:
Node R0 : message-> /R0/tx/number -> ros_callback -> [RT-WMP-MESSAGE]

-> RT-WMP (priority, mobility and multi-hop management) <wireless medium> ->

NODE R1 : [RT-WMP-MESSAGE] -> ros_publish -> /R1/rx/R0/number -> message
Check communication with wmpSniffer
To see what is happening we can use the ros-rt-wmp-sniffer. While the nodes are running type:
rosrun ros_rt_wmp_sniffer ros-rt-wmp-sniffer lo
A protocol sniffer window will appear. Press 'Record' and specify 3 nodes for the Number of nodes parameter. Then click OK.
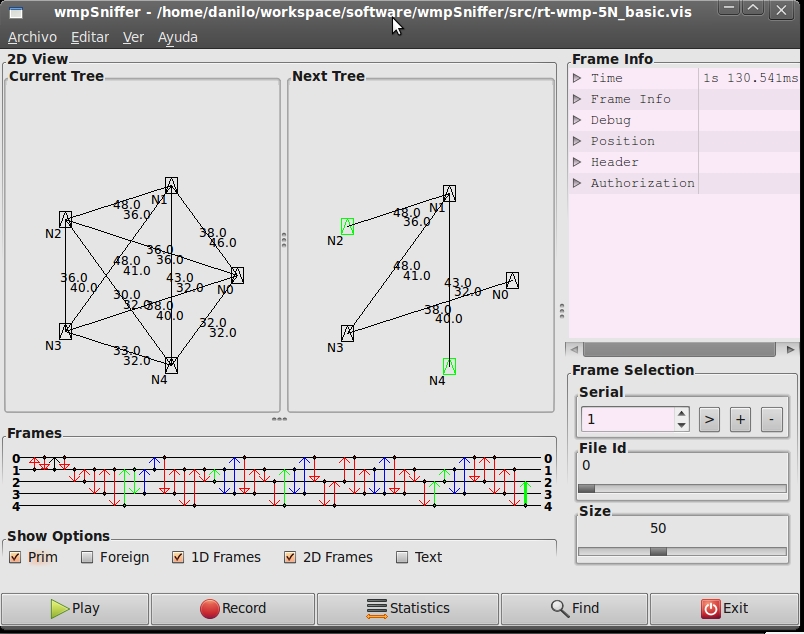
After confirming the recording, something like this will appear.
The vertical lines of different color are the frames that the three nodes are exchanging among them. Red arrows are tokens, green are authorizations and blue are messages (see [1..5]).
With this tool is possible to verify if everything is working right. Check the different options of the application to figure out bandwidth, errors and so on. The value of Actual EFZ in the lower bar should increase. Moreover the frames should repeat a fixed pattern.
Notice: The ros-rt-wmp-sniffer is in a early development stage, thus it works but is not completely stable. Any help on the development will be appreciated. Notice 2: More information about the sniffer (and the RT-WMP) can be found in my PhD thesis here.
Using multiples roscore
To verify the fact that ROS did not took part in the communication, you can launch 3 different roscore in the same machine as follow:
1. Open 3 terminals. The use of terminator (sudo apt-get install terminator) is recommended.
In terminal #1:
$ ROS_MASTER_URI=http://localhost:11311
$ roscore -p 11311 &
$ rosrun ros_rt_wmp ros-rt-wmp --node-id 0 --num-nodes 3 --auto-namespace
In terminal #2:
$ ROS_MASTER_URI=http://localhost:12311
$ roscore -p 12311 &
$ rosrun ros_rt_wmp ros-rt-wmp --node-id 1 --num-nodes 3 --auto-namespace
In terminal #3:
$ ROS_MASTER_URI=http://localhost:13311
$ roscore -p 13311 &
$ rosrun ros_rt_wmp ros-rt-wmp --node-id 2 --num-nodes 3 --auto-namespace
In this way we defined three separate ROS 'partitions' with their roscore in the same machine.
Then, open 2 additional terminals:
In terminal #4:
$ ROS_MASTER_URI=http://localhost:11311
In this way we have 'moved' to the first 'partition'. Then type:
$ rostopic list
/R0/info
/R0/tx/number
/rosout
/rosout_agg
Now move to the second and third 'partition':
$ ROS_MASTER_URI=http://localhost:12311
$ rostopic list

/R1/info
/rosout
/rosout_agg

$ ROS_MASTER_URI=http://localhost:13311
$ rostopic list

/R2/info
/rosout
/rosout_agg
As you can see each roscore only knows the topics of one 'partition' only. However the network is connected:
$ ROS_MASTER_URI=http://localhost:11311
$ rostopic echo /R0/info
serial: 4113
loop_id: 8026
connected: 1
---
serial: 4183
loop_id: 8166
connected: 1
---
Now, publish something on R0:
$ ROS_MASTER_URI=http://localhost:11311
$ rostopic pub /R0/tx/number std_msgs/Float64 100.2 -r 1
In terminal #5 switch to the second 'partition':
$ ROS_MASTER_URI=http://localhost:12311
$ rostopic echo /R1/rx/R0/number

data: 100.2
---
data: 100.2
---
data: 100.2
and to the third:
$ ROS_MASTER_URI=http://localhost:13311
$ rostopic echo /R2/rx/R0/number

data: 100.2
---
data: 100.2
---
data: 100.2
If everything has gone right, you can stop all the nodes. Again, the topic number present on R0 has been replicated in the R1 and R2 having, each of them a different roscore. The communication, also in this case, was managed by the RT-WMP protocol.
The ros_rt_wmp node also supports services replication. The node has been pre-configured with a simple service to demonstrate this functionality.
In terminal #1 (R0) type:
$ rosrun roscpp_tutorials add_two_ints &
In the same terminal try to type:
$ rosservice list
/R0/remote/wmp_control
/R0/wmp_control
/add_two_ints
...
Ignore, for the moment the services /R0/remote/wmp_control and /R0/wmp_control.
The service add_two_ints is a roscpp_tutorial that receives two ints and sum them. Let's check it out:
$ rosservice call /add_two_ints 3 4
sum: 7
This call was direct to the service in R0. Go now to the terminal #2 (R1) and type:
$ rosservices list
/R1/remote/wmp_control
/R1/wmp_control
/R1/R0/add_two_ints
/add_two_ints
...
We have exposed a service that resides in R0 to R1 and it appears as /R1/R0/add_two_ints. The syntaxis means that in node R1 we have a service from R0 called add_two_ints. Let's try to call it.
rosservice call /R1/R0/add_two_ints 13 4
sum: 17
The service was actually called in R0 (we don't have that service in R1!) and the result was obtained in R1 again through the RT-WMP protocol. You can repeat the same experiment with R2.
Distribute nodes in multiple machines
These tests have been performed locally. However, obviously, we want to connect different machines. To make this test at least three computers are needed. The first step is set up a working ad-hoc network. You can do that using the Ubuntu's network manager or by hand. Set the ESSID to 'rt-wmp' and give to the machine a fixed IP.
Warning >>>
Is extremely important to disable the network manager if you setup the configuration by hand. If you does not, it will retry to configure the network as it wants. You can do that typing (Ubuntu):
$ sudo service network-manager stop
Please notice that this command will also affect the ethernet connection that you will have to reconfigure by hand as well.
<<< Warning
Suppose that the three computer have the addresses 192.168.1.1, 192.168.1.2 and 192.168.1.3 for R1, R2 and R3 respectively. To verify that the network is correctly configured the ping among the three computer must work efficiently:
From the PC with network address 192.168.1.1 (R0):
$ ping 192.168.1.2
PING 192.168.1.2 (10.3.27.20) 56(84) bytes of data.
64 bytes from 192.168.1.2: icmp_seq=1 ttl=64 time=0.023 ms
64 bytes from 192.168.1.2: icmp_seq=2 ttl=64 time=0.011 ms
etc.
After that in each machine repeat the configuration explained in the previous sections (basically compile the unizar-rt-wmp-ros-pkg stack).
Up to the moment the protocol used the loopback interface lo to communicate within the same machine. Now it is the moment to tell to the protocol to use a real interface. It must be done by means of a configuration file that must be created like that:
$ mkdir ~/.rt-wmp
$ echo "DEVICE wlan0" > ~/.rt-wmp/rt-wmp-us-raw.ll
where wlan0 is the wireless interface we pretend to use (you have to replace that name if the name is different, for example wlan1).
Then execute:
$ rosrun ros_rt_wmp ros-rt-wmp --node-id X --num-nodes 3 --auto-namespace
where X = 0, 1, 2 in R1, R2 and R3 respectively.
e.g. for R0:
$ rosrun ros_rt_wmp ros-rt-wmp --node-id 0 --num-nodes 3 --auto-namespace
Warning >>>
When launched, the protocol will change the configuration of the wifi card by itself putting it in ad-hoc mode (if it is not), setting the ESSID, frequency and power. Moreover it creates a monitor interface mon0 and to be able to listen to other nodes transmission and obtain information about the signal strength (using libpcap). If you want to avoid that, you can add a line in the configuration file like this:
$ echo "USE_MONITOR 0" >> ~/.rt-wmp/rt-wmp-us-raw.ll
However in this case you will not be able to use the signal-quality-aware routing of RT-WMP.
<<< Warning
The result will be something like:
Reading /home/user/.rt-wmp/rt-wmp.cfg...
File rt-wmp.cfg not found...
Using default values (timeout: 100).
*** Queues loaded, allocated 3204 kbytes
*** Queues loaded, allocated 3211 kbytes
Reading Low Level Configuration file (/home/user/.rt-wmp/rt-wmp-us-raw.ll)...
READ OPTION: DEVICE = wlan0
Done.
Successfully opened socket: 4
Successfully got interface index: 3
Host MAC address: 90:4C:E5:AD:BF:1D
Checking sudo...OK
Checking iw...OK
Checking iwconfig...OK
Checking interface mon0...OK
Setting frequency for mon0...OK
Setting mode ad-hoc for wlan0...OK
Setting frequency and tx power for wlan0...OK
Opening device mon0...Success.
*** Node 2 of 3 is up and Running...
In each one of them we obtain (e.g. for R0 @ 192.168.1.1):
$ rostopic echo /R0/info
serial: 4113
loop_id: 8026
connected: 1
and
$ rostopic list
/R0/info
/R0/tx/number
/rosout
/rosout_agg
If we execute:
$ rostopic pub /R0/tx/number std_msgs/Float64 120.5 -r 1
In R1 @ 192.168.1.2 we will obtain:
$ rostopic echo /R1/rx/R0/number

data: 120.5
---
data: 120.5
---
data: 120.5
and something similar in R2 @ 192.168.1.3:
$ rostopic echo /R2/rx/R0/number

data: 120.5
---
data: 120.5
---
data: 120.5
We are now successfully replicating the topic number in two different machines. The same can be repeated with service in the same way as explained in the previous section.
Again, it is possible to check what's happening with the wmpSniffer. In one of the machines execute:
$ rosrun ros_rt_wmp_sniffer ros-rt-wmp-sniffer mon0
and repeat the process described above. Notice that now the parameter is the monitor interface mon0 and not lo. You should also see now the real signal-stregth among the nodes.
Configuring the node
Since the ros_rt_wmp node must offer the possibility of distributing *whatever* kind of topic/service, it is not a compile and forget node. It has to be configured at compile time to fit to user necessities. However, this process is very easy and painless.
It suffices to modify a single configuration file in the source directory called config.h, that's all.
This distribution includes a pre-configured sample node that is described and tested in the previous section. Let's check it out:
$ vi ros_rt_wmp/src/config.h
You will see:
#ifndef CONFIG_H_
#define CONFIG_H_
#include "macros.h"

/* INCLUDE DATA TYPE HERE */
#include <std_msgs/Float64.h>
#include <roscpp_tutorials/TwoInts.h>


/* INCLUDE TOPIC and SERVICES HERE */
BEGIN_TOPIC_DEFINITION

TOPIC("number",std_msgs::Float64,"0","1,2",11);
SERVICE("/add_two_ints", roscpp_tutorials::TwoInts, 0, 10);

END_TOPIC_DEFINITION
To add a different topic or service we have to follow 3 steps:
1. Include the type of data that we want to use.
2. Define the topic/service
3. Add the dependency in the manifest.xml
As an example if you want to share laser data, edit the config.h file in the ros_rt_wmp directory as follow:
$ vi src/config.h
Add the #include directive correspondent to the type of data that you want to share.
#include <sensor_msgs/LaserScan.h>
Then, specify the topic in the correspondent section:
TOPIC("laser", sensor_msgs::LaserScan,"0","1,2",11);The result will be:
#ifndef CONFIG_H_
#define CONFIG_H_
#include "macros.h"

/* INCLUDE DATA TYPE HERE */
#include <std_msgs/Float64.h>
#include <roscpp_tutorials/TwoInts.h>

#include <sensor_msgs/LaserScan.h>

/* INCLUDE TOPIC and SERVICES HERE */
BEGIN_TOPIC_DEFINITION

TOPIC("number",std_msgs::Float64,"0","1,2",11);
SERVICE("/add_two_ints", roscpp_tutorials::TwoInts, 0, 10);

TOPIC("laser",sensor_msgs::LaserScan,"0","1,2",11);

END_TOPIC_DEFINITION
Finally we have to include the package where this type of data is defined in the manifest.xml file as for example:
$ vi manifest.xml
and insert
<depend package="sensor_msgs"/>
The result should be something like that:
<package>
  <description brief="ros-rt-wmp-us-raw">

     ros-rt-wmp-us-raw

  </description>
  <author>Danilo Tardioli, dantard@unizar.es</author>
  <license>GPL v2 </license>
  <review status="unreviewed" notes=""/>
  <url>http://ros.org/wiki/ros-rt-wmp</url>

  <rosdep name="libpcap" />
  <depend package="std_msgs"/>
  <depend package="roscpp"/>
  <depend package="rospy"/>
  <depend package="tf"/>
  <depend package="ros_rt_wmp_msgs"/>

  <depend package="sensor_msgs"/>

</package>
The same process must be followed for including new services. IMPORTANT: After that you need to recompile the node by typing:
$ roscd ros_rt_wmp
$ rosmake
TOPIC definition details
The topics have several parameters:
TOPIC("topic_name", data_type, SOURCE, DESTINATION, PRIORITY);e.g.
TOPIC("laser",sensor_msgs::laserScan,"0,1","0,1,2",10);The first field is a string that specifies the name of the topic to be replicated. The second field specifies the data type of the topic. The subsequent two fields specify the source and the destination of the topic. The next field specifies the priority of the flow (a natural number between 0 and 127).
In the example we are specifying that robots R0, and R1 have the input topic /Rx/tx/laser (x = 0, 1) and that the three nodes will receive data from all the other nodes in the topic /Rx/rx/laser/Ry (x, y = 1, 2, 3). Obviously local topics will not be republished (that is, node R0 will not have /R0/rx/R0/laser node).
Just to give another example, if robot R0 is the master and is the only that need the data from the other, we can write:
TOPIC("laser", sensor_msgs::laserScan, "1,2", "0", 10);If you prefer to start the topic stopped, (that is, you prefer that ros_rt_wmp filter this topic until it is actived explicitly) you can use:
TOPIC_START_STOPPED("laser",sensor_msgs::laserScan,"0, 2","1",10);We'll se later how to start this kind of topics.
SERVICE definition details
The services have to be defined also in the same section as follow:
SERVICE("service_name", data_type, SERVICE_HOST, PRIORITY);Notice that SERVICE_HOST is this time an integer (the id of the node offering the service) and not a string. e.g.
SERVICE("factorial", myapp::factorial_data, 2, 23);It means that robot R2 is offering the service factorial to the other. In all the other robots will be automatically defined a service as (e.g. for R1):
/R1/R2/factorial
that can be called like any other local service. However, node R2 can't call its local factorial service by means of a remote call, it must call it directly.
The TF topic
When managing sensor data it is important to share the TF data among nodes. The ros_rt_wmp node, allows that. To enable this feature write:
TOPIC_TF(SOURCE, DESTINATION);
e.g.
TOPIC_TF("0,1","2");where SOURCE and DESTINATION are strings that specify which robots have to propagate its TF data and to which nodes. Let see an example:
TOPIC_TF("0,1","2");It means that robot R2 will receive TF data from R0 and R1.
NOTICE: The TF topic is a special topic since data are published in it in an asynchronous form and with arbitrary frequency. Sharing these data using a protocol-message for each TF-message, would result in a high bandwidth use. To alleviate this problem, the ros_rt_wmp node packs various TF data in a single message and send it to the destination node(s) all together. It can result is a slight delay in the TF data updating that is, however, assumable in the most part of cases.
Controlling the ros_rt_wmp
A very useful characteristic of the ros_rt_wmp, is the possibility of control it both locally and remotely. Every ros_rt_wmp node has a wmp_control service that can be used to change node behavior. The message that has to be specified to use this service is the WMPControl defined in the ros_rt_wmp_msgs package. It is defined as:
ros_rt_wmp_msgs/WMPServiceHeader header
int32 command
int32 param1
int32 param2
string param3
---
int32 result
The command field specifies the requested command among those defined in Manager.h file as:
enum wmp_commands_t {
STOP, TOPIC_STOP, TOPIC_START, TOPIC_DECIMATE, TOPIC_JUSTONE
};
These mean:
STOP (= 0) does nothing
TOPIC_STOP (= 1), stops the topic specified in the 'param3' field
TOPIC_START (= 2), starts the topic specified in the 'param3' field
TOPIC_DECIMATE (= 3), decimates messages of topic 'param3' a factor 'param1'
TOPIC_JUST_ONE (= 4), sends a single update of topic 'param3'
Regarding the TOPIC_DECIMATE command, if param1 = 10 the ros_rt_wmp node will send through the network only 1 out of 10 message published on the topic specified in param3.
The ros_rt_wmp nodes have also a /remote/wmp_control service that can be used to modify the configuration of remote nodes in the same way. However, in this case the WMPServiceHeader must be filled at least with the address of the node that have to be configured.
RT-WMP advanced configuration
As explained, the ros_rt_wmp node uses the RT-WMP protocol. It is a quite large protocol that has several features and it has been, is being and can be used also as communication library outside ROS. It has a lot of configuration parameters that can be tuned to fit in a concrete application. In the ros_rt_wmp node the default ones are used, but they can be modified by means of a configuration file called rt-wmp.cfg.
This file must be created in the ~/.rt-wmp directory as follow:
$ cd ~/.rt-wmp
$ vi rt-wmp.cfg
Some the most important configuration parameters are:
1.Timeout before retry the sending of a frame expressed in ms.
TIMEOUT n
e.g.
TIMEOUT 10
2.Number of retries while sending a packet of whatever type.
RETRY n
e.g.
RETRY 1
Using ros_rt_wmp in the kernel space
The ros_rt_wmp package can be used together with the RT-WMP protocol running in the kernel space. It means that you can use the RT-WMP protocol instead of the IP protocol and use its characteristics of mobility and priority management. To do that you need to install a modified version of the mac80211 module provided with the stack and the modules of the protocol. Then, the ros_rt_wmp will use these modules (by means of an us-ks interface) to establish a communication among the different machines. The advantage of this configuration is that you can access the remote machines through the RT-WMP protocol in a transparent way opening, for example, a SSH session.
Let's see it step by step. First of all we have to set a configuration file to compile this version of the ros_rt_wmp. Enter the ros_rt_wmp directory and type:
$ echo "set(type ros-rt-wmp-ks)" > .target
$ rosmake
These commands will compiles the both the RT-WMP modules and the modified version of the mac80211 module and will compile the ros_rt_wmp to use that. Notice that the executable name will be ros-rt-wmp-ks.
Warning: to be able to compile the modules you need to install the linux-headers of the kernel that you're running. Moreover, for the moment, the only supported kernels are all the flavours of 3.2 and 3.5.
Warning-2: You MUST be sure that the gcc that you're using to compile the modules is the same as that used to compile your kernel. Please check it this way:
$ cat /proc/version
Linux version 3.5.0-18-generic (buildd@roseapple) (gcc version 4.6.3 (Ubuntu/Linaro 4.6.3-1ubuntu5) ) #29~precise1-Ubuntu SMP Mon Oct 22 16:32:29 UTC 2012

$ gcc --version
gcc (Ubuntu/Linaro 4.6.3-1ubuntu5) 4.6.3
Copyright (C) 2011 Free Software Foundation, Inc.
This is free software; see the source for copying conditions.  There is NO
warranty; not even for MERCHANTABILITY or FITNESS FOR A PARTICULAR PURPOSE.
Let's check the results. In the same directory type:
ls -l rt-wmp/modules-x86/
-rw-rw-r-- 1 user user 607303 Mar 29 16:16 mac80211.ko
-rw-rw-r-- 1 user user  23078 Mar 29 16:16 rt_wmp_interface.ko
-rw-rw-r-- 1 user user 110743 Mar 29 16:16 rt_wmp.ko
The three modules have appeared there. Moreover:
ls -l bin/
-rwsrwsr-x 1 root root 2054720 Mar 29 16:13 ros-rt-wmp
-rwsrwsr-x 1 root root 1796816 Mar 29 16:16 ros-rt-wmp-ks
The next step is to install the modules. To do that we've to remove before the wireless modules, then the mac80211 and the install those three. The process is (for example for b43-based wireless cards):
$ sudo rmmod b43 mac80211
$ sudo insmod rt-wmp/modules-x86/mac80211.ko
$ sudo modprobe b43
$ sudo insmod rt-wmp/modules-x86/rt-wmp.ko
$ sudo insmod rt-wmp/modules-x86/rt-wmp_interface.ko
There exist a script that do that but I can't guarantee that it works with 100% of the cards. If you want to try, enter the rt-wmp directory and type:
$ sudo make insmod
Warning: You MUST check that your wireless card is well configured using the network manager (as before, ad-hoc mode) or you have to disable the network-manager.
After that check that all the modules have been correctly loaded:
$ lsmod | grep rt_wmp
rt_wmp_interface       17531  0
rt_wmp                104325  1 rt_wmp_interface
mac80211              479351  2 rt_wmp,b43
Also, a wmp0 interface should have appeared:
$ sudo ifconfig wmp0
wmp0      Link encap:Ethernet  HWaddr 00:00:00:00:00:00
          BROADCAST NOARP  MTU:1388  Metric:1
          RX packets:0 errors:0 dropped:0 overruns:0 frame:0
          TX packets:0 errors:0 dropped:0 overruns:0 carrier:0
          collisions:0 txqueuelen:5
          RX bytes:0 (0.0 B)  TX bytes:0 (0.0 B)
Now it is the moment to setup the RT-WMP network. The protocol when runs in the kernel space uses an IP-like address. The nodes address is specified this way:
$ sudo ifconfig wmp0 192.168.x.y
where x is the number of nodes in the network and y is the node id starting from 1. It means that R0 has the address 192.168.x.1. Suppose we want to setup a 3-nodes network (3 machines needed). You can do that this way:
Machine 1 (R0): IP 192.168.3.1
$ sudo ifconfig wmp0 192.168.3.1

Machine 2 (R1): IP 192.168.3.2
$ sudo ifconfig wmp0 192.168.3.2

Machine 3 (R2): IP 192.168.3.3
$ sudo ifconfig wmp0 192.168.3.3
After that let's ifup the wireless interface if it is not (the RT-WMP will use this interface to communicate!):
$ sudo ifconfig wlan0 up
To the the correct configuration, let's try to ping each other. From R0:
$ ping 192.168.3.2
PING 192.168.3.2 (192.168.3.1) 56(84) bytes of data.
64 bytes from 192.168.3.2: icmp_seq=1 ttl=64 time=2.230 ms
64 bytes from 192.168.3.2: icmp_seq=2 ttl=64 time=1.116 ms

$ ping 192.168.3.3
PING 192.168.3.3 (192.168.3.1) 56(84) bytes of data.
64 bytes from 192.168.3.3: icmp_seq=1 ttl=64 time=4.230 ms
64 bytes from 192.168.3.3: icmp_seq=2 ttl=64 time=1.496 ms
etc.
At this point the RT-WMP network is configured. The IP traffic is encapsulated in RT-WMP frames and managed transparently. You can also try to open an ssh session if you want.
Again, you can check what is happening running the ros-rt-wmp-sniffer on another machine setting up a monitor interface (e.g. mon0) in the same frequency as the nodes of the network and running the sniffer as exaplained before.
Now it's moment to run the ros-rt-wmp-ks node. In each one of the machines run:
$ rosrun ros_rt_wmp ros-rt-wmp-ks  --auto-namespace
Node R0 id 0 of 3 is running.
Notice that this time the switches --node-id and --num-nodes are not necessary since the id is fixed by means of the IP address. Exactly like in the user-space version you can see in R0:
$ rostopic list
/R0/info
/R0/tx/number
/rosout
/rosout_agg
You can repeat now all the experiments of the previous sections. Do not forget to launch a roscore in each machine.
However, at the same time you can still connect transparently to the other machines taking advantage of multi-hop and priority support. That's the difference! BTW, standard IP traffic has the lower priority to not interfere with ROS traffic.
To stop using the RT-WMP network, you can put down the wmp0 interface or remove the modules:
$ sudo ifconfig wmp0 down

or

$ sudo rmmod rt_wmp_interface rt_wmp
It is not necessary to replace the mac80211 module with the legacy one since the modified version works as the legacy when the RT-WMP modules are not loaded.
IMPORTANT: The 'RT-WMP' modules have been extensively tested and verified. Even so, probably they are not error-free. Since they work in the kernel-space, an error would probably mean a kernel panic and the entire system to get stuck with the problems that this situation can provoke.
All the software provided is supplied 'as is' and all use is at your own risk. We disclaims all warranties of any kind, either express or implied, as to the software. Neither this agreement nor any documentation furnished under it is intended to express or imply any warranty that the operation of the software will be uninterrupted, timely, or error‐free.
Troubleshoothing
If compilation of ros_rt_wmp lasts too much, probably you didn't execute the sudo -v command before the rosmake. Please check the Compiling the node section.
